
Building of a galley “dungeon” drawer
The galley dungeon, you know that storage area next to the stove on most DeFever 44 & 49’s that you cannot do much with; the one where if you drop something you want down there you a trained monkey to go down and retrieve it for you. Well, it just seemed to need some kind of shelf or something to make the space more usable. But the hatch is too small to get much of anything in there to help organize the area. And if you did get something in there, you wouldn’t be able to rotate it into a usable position.
So, after some head-scratching, I figured out the only way to get something in there was to build, or at least assemble, it in the dungeon. And once I came to that conclusion, there was the problem of just how, and in what order, to do the assembly. So a cabinet-maker friend and I got out the napkin and designed a sliding box which could be assembled in place. Here are the basics of building a galley dungeon drawer.
The basic idea is a “drawer” (box) which will slide on rails allowing it to slide out-of-the-way to gain access to the bottom section, but not slide while underway. The drawer is a half-inch narrower than the dungeon is wide, about half of its length, and about a foot deep. It rides on 2 rails screwed to the sides, which are notched to prevent unwanted movement.
Building process:
Make the drawer:
I used ½ plywood which I painted white to reflect what little light is in the dungeon. I dadoed the front, back, and bottom for a tight fit then screwed it together. Note that all the screws need to go in from the front, back, or bottom…not from the side. Once it all assembled and all pretty…disassembled it.
Cut 2 rails: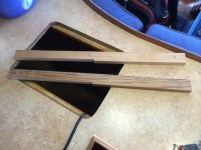
I used 1 X 2’s and notched one end down about 3/8’s of an inch the length of the drawer (pictured right).
Angle the notch:
Cut notch at an angle so the drawer does not have to be “lifted” up, but can slide up to access (pictured right). Pre-drill 3 holes for screws to attach rails to sides. Note that the center hole needs to be accessible when the drawer is in place so it can be secured after drawer is in place (ie inboard of the notch).
Install rails:
Secure rails to dungeon walls about an inch below the height of your drawer (pictured right). Be careful, remember the dungeon is not square in any corner.
Assemble drawer front and sides:
Place a drawer side and front in dungeon on rail (pictured right). Screw together, repeat on other side. You now have a “U” shaped object on the rails.
Remove the 2 inboard screws on both rails:
Since you can’t reach the rest of the drawer to complete the assembly, you need to remove the 2 inboard screws on each side so the rails can swing down out-of-the-way (pictured right).
Complete drawer assembly: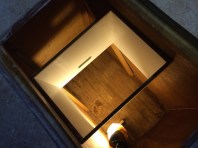
Now you can rotate the drawer to attach the back, and again to secure the bottom (pictured right & below).
Reinstall rails:
Now rotate drawer into correct position, and reinstall rails under it (pictured right).
BINGO! One finished dungeon drawer and a great place for those tall things like pasta in an area which was once basically unusable.

Great idea! Thanks for sharing the pictures.
good job! Previous owners had already made use of our “hole” and I actually put my kitchen trash can down inside to get it out of the way….no drawer but have a shelf for storing blender, tall bottles and my plastic storage bags.